Photoshop creative morning at sea
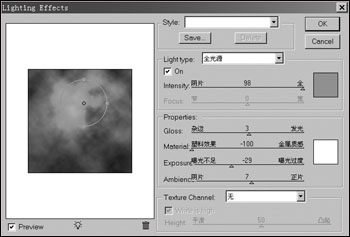
Creative Tools: Photoshop 7.0/CS The graphic creative theme imitates the sunrise at sea. Imitating some natural scenes is often applied to an effect in graphic production practice. The reader learns how to create a sunrise effect on the sea so that readers can master the production of such scenarios, such as "Middle of the Moon at Sea". Graphic use: Greeting cards, cartoon scenes, etc. creative approach: The implementation of this idea is mainly accomplished by using tools such as Photoshop's Lighting Effects filter and Gradient Tool. The steps are as follows: (1) Create a 600×600 pixel image file with color mode RGB. Create a new layer, filled with black. Set the foreground color to black and the background color to yellow. Use the "Filter → Render → Cloud" command to create a yellow-black cloud effect. (2) use the "filter → rendering → lighting effects" command, in the pop-up lighting effects dialog box to set the type of light source is "full light" light source color is orange, adjust the color and relative position of the light source, as shown in the figure, single Press the OK button to confirm. figure 1 (3) Using the "Filter → Distortion → Ocean Ripple" command, set the ripple size to 13 and the number of ripples to 17 in the open dialog box. Then use the "Edit → Transform → Perspective" command to perform a perspective transformation on the image and then change the size, as shown in the figure. figure 2 (4) Select the toolbox oval box tool, draw the selection shown in Figure 2, click on the taskbar "Add to Selection" button, and then use the rectangular box tool, draw a rectangle on the elliptical selection Constituency, at this time, the two constituencies add up to a collection. (5) Use the shortcut “Ctrl+Shift+I†to invert the selection, and then use the shortcut “Ctrl+Alt+D†to set the feather radius to 10. Press the "Delete" key to delete the image in the selection. The effect is as shown in the figure. image 3 (6) Set the foreground color to yellow and the background color to red. Select the gradient tool in the toolbox, set the gradient mode to radial gradient, and draw a gradient pattern where the sun rises. The effect is shown in the figure. Figure 4 (7) Create a new layer. Select the elliptical marquee tool in the toolbox to draw an approximately perfect circle and fill it with red as the sun. Then use the elliptical marquee tool to draw an elliptical selection below the red sun, as shown in the figure. Figure 5 (8) Press the "Delete" key to delete the image in the selection area, as shown in the figure, and then use the shortcut key "Ctrl + D" to delete the selection, the effect of the deleted graphics as shown. Figure 6 Figure 7 (9) Use the moving tool to move the drawn sun figure to the center of the water-leveling flat line. Select the custom shape tool in the toolbox, select the bird shape graphic in the shape panel, add a few birds, and adjust the size and position. Figure 8 So far, the effect of the morning sunrise at the sea has been completed. The effect is as shown above. Stainless Leveler Feet,Stainless Adjustable Feet,Stainless Leveling Feet,Stainless Steel Adjustable Leveling Feet Cixi Ruixin Machine Components Co., Ltd , https://www.rmlevelingfeet.com